Welcome to Barbara Joyce's Blog
April 27, 2018
I just love this little duck with his umbrella--definitely a Seattle
duck! This card will go to my friend, Judy, for her birthday. She is
always a ray of sunshine.

April 20, 2018
This card is a total copy of one I saw on Pinterest. Rarely have I found a card online
that looks perfect to me. This is one of them, although I did make a couple of teensy changes
in the art panel. This card is going to my nephew for his birthday.

April 15, 2018
This card is for Laura's birthday. She is quite the artist, so I decided this theme would
be appropriate. I used a stencil to stamp the tube of paint, each time rotating the cardstock 1/8 turn.
The inside says, "You make everything COLORFUL."

September 4, 2017
Most of the color combinations are due to my participation
in the Splitcoast Color Challenges each week. I am honored to be on the team, and have learned which combos
sing to me, and which I won't bother with again! Sadly, this first card is in the latter group. The stamp was
designed by Helen Dardik. I love the image, but orange has never been a favorite color for me. The colors are
Peekaboo Peach, Pool Party and Basic Black, with an option for adding green, which I did! Stamped with Ranger
Archival Black ink and colored with Zig Real Brush Clean Color Markers.

August 28, 2017
This is the first card I made with the stamps from my new "Stamp of Approval" box. The colors are
Soft Suede, Crumb Cake and Tranquil Tide.

August 14, 2017
I don't usually "do" Halloween, but when My Favorite Things came out with this set, I found
it irresistlble. I love making shaker cards!

August 7, 2017
This card was made with the stamp and die set, "Courage," which was sold to raise money
for breast cancer research. The colors are Berry Burst, So Saffron and Pear Pizzazz.

August 5, 2017
Occasionally, Splitcoast has a week-long series of challenges. I never seem to find time to make lots of cards.
Usually, one per week for the Color Challenge. Thank goodness for that obligation, or I might not even make
that many. Anyway, I made this quickie card for a challenge, to make an interactive birthday card.

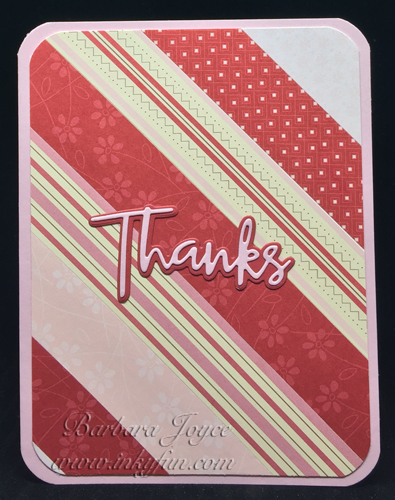
This next card was posted the same day, but for a different challenge. This time we were supposed to use up
scraps of patterned paper. I think the front is excessively busy, but I do like the two-layer "Thanks" die cuts.
 Older Posts
|